Sunday, April 29, 2012

Strawberry Lemonade Cupcakes


I have come to the realization that I am no longer cool.  (This statement presupposes that once, I actually was cool, but whatever.)  I am like the queen of the nerds these days...and yet I am strangely OK with this.  Do you need examples?  I speak Old English.  Like, the language that Beowulf was written in.  I love teaching my AP English class-- so much so that I spend a week every summer reading and scoring the exams.  I listened to MxPx in high school-- and I am still listening to them, which is basically the definition of uncool.  I geek out over new books.  I watch historical programs on TV (on Showtime, but still).  I would rather stay home and watch bad TV (like One Tree Hill) on a Saturday night than go out.  I bake for fun.  I have a blog. All of this is fine with me. 

I guess the baking part really isn't too uncool-- people love baked goods and are actually pretty impressed by them, so this hobby doesn't really add to my geek-dom.  These cupcakes are actually a request from little miss, who wanted something strawberry-- so these are also dairy-free, not that you can tell.  The cupcakes are cool-- even if their creator is not. :)

Strawberry Lemonade Cupcakes

Lemonade Cupcakes
Makes about 24 cupcakes

2 sticks unsalted butter, room temperature*
2 cups sugar
4 eggs
3 cups all-purpose flour
2 tsp baking powder
1/2 tsp salt
1/4 cup lemonade powder mix (Country Time or similar)
1 cup milk**
3 Tbsp lemon juice (juice of 1 lemon)
1 Tbsp lemon zest (zest of 1 lemon)
1 tsp vanilla extract

*I used Willow Run soy margarine
**I used unsweetened almond milk

Preheat oven to 350 degrees and line two cupcake pans with liners.  In a medium bowl, mix together the flour, baking powder, salt, lemon zest and lemonade powder-- whisk together. 

In a large bowl, or the bowl of a stand mixer, cream together butter and sugar on medium speed until light and fluffy.  Add eggs one at a time, being sure to scrape the bowl after each addition.  Add the lemon juice and vanilla and mix until combined.

Alternate adding the dry ingredients and the milk, beginning and ending with the dry ingredients.  Fill the cupcake liners approximately 2/3 full.  Bake at 350 for 20 minutes or until toothpick inserted in the middle comes out clean.  Let cool in the pans for 5 minutes, then transfer to wire racks to finish cooling.

Strawberry Filling
(From Wilton)
Makes about 2 cups of filling

1 16-oz package of frozen sliced strawberries
1/3 cup granulated sugar
3 Tbsp cornstarch
1 tsp lemon juice

Thaw and drain strawberries, reserving liquid.  (I do this by letting the strawberries thaw in a strainer over a large liquid measuring cup.)  Add enough water to the strawberry liquid to equal 1 1/4 cup.  In a medium saucepan, combine liquid, sugar, cornstarch, and lemon juice; mix well.  Heat over medium-high heat until mixture thickens and boils.  Cool completely, then stir in sliced strawberries.


The icing for these cupcakes is swirled strawberry and lemon buttercream (recipes for each below), which was much easier to do than I expected.  I used the tutorial on Good Life Eats (access through the link) to do this-- there are step-by-step instructions and pictures, all of which are much clearer than I could provide.  If you want to try the swirled icing, I highly suggest you take a look at the tutorial provided-- it's really good. :)

Lemon Buttercream
(From Wilton)

1/4 cup vegetable shortening (I used Crisco, but you can use all butter)
1/4 cup unsalted butter, room temperature
1 Tbsp lemon juice
1/2-3/4 tsp lemon zest
2-3 cups powdered sugar

Cream together the butter and vegetable shortening in a large bowl or the bowl of stand mixer until light and fluffy.  Add lemon juice and zest and beat well.  Add powdered sugar, one cup at a time, scraping the bottom and sides of the bowl after each addition.  Beat well on edium speed until fluffy.  Add extra sugar or lemon juice until icing has reached desired consistency.

Strawberry Buttercream
(Adapted from Wilton)

1/4 cup unsalted butter, room temperature
1/4 cup vegetable shortening (I used Crisco)
1/2 tsp clear vanilla extract
2-3 cups powdered sugar
1/4 cup strawberry preserves

In a large bowl, or the bowl of a stand mixer, cream together the butter and shortening until light and fluffy.  (Again, you can use all butter if you'd like.)  Add the vanilla and mix until combined.  Add sugar one cup at at a time-- beat well on medium speed, scraping the sides and bottom of the bowl often.  (At this point, the icing will look dry.)  Add the strawberry preserves and beat until incorporated.  Add extra sugar or preserves until icing is the correct consistency.

To Assemble Cupcakes:
Core the cupcakes using the cone method.  Fill each cupcake with the cooled strawberry filling.  Frost the cupcakes-- see above for the swirled method and link to the tutorial.  Eat and enjoy!


Sunday, April 22, 2012

Vanilla Bean Cupcakes with Monograms


This spring has been crazy busy-- even crazier than usual.  I expect a certain level of insanity this time of year-- prepping my students for the AP, doing my own final papers for my spring class, chaperoning prom, all accompanied by a general desire to start the summer, which means I stay up way too late reading or doing something slightly less productive, like watching The Borgias with Ana.  This year I've added the unenviable task of being in charge admitting the 8th graders to the AP program in my high school, along with various other AP tasks. Also, little miss has started her first season of soccer, which means practice and games twice a week, which is SO. CUTE-- but it adds up. So, needless to say (although I just did), I am swamped.  "Psychotically busy" is probably the best way to describe it. 

Because of this, I have developed a bad habit of thinking that doing any activity that isn't immediately associated with school (either the school I teach at or my graduate work) is wasting my time.  So all the things I enjoy doing, like reading, spending time with family and friends, catching up on bad TV, going to the beach, taking a nap, baking, blogging, listening to music, idly looking at Pinterest, etc-- all those things that keep me sane-- all those things have become unproductive in my brain and I feel guilty for doing them.  So my resolution for the rest of this spring is, at the end of the day, to review all the things I did accomplish, not the things I left undone.  For example, today my school bag stayed in my car.  However, I did watch cartoons with little miss this morning.  I got to go to lunch with my husband and little miss.  We all went grocery shopping together.  I took a nap (which was amazing).  I finished reading The Swerve by Stephen Greenblatt.  I read more of Charlie and the Chocolate Factory to little miss.  And now I am (finally) updating this blog.

Looking at my life this way makes me much happier.  You should try it.  :)

How to Make Cupcake Monograms
From ohcupcakes! via Pinterest

Ingredients:
4-6 blocks of Candy-Quik (I used vanilla)
Round multi-colored nonpareil sprinkles

These are actually very easy-- I was shocked.  I don't have a very steady hand, and any attempts I have made at decorations prior to this have been disastrous.  But these turned out great!  One of the things that helped was the fact that I printed guide sheets to trace for all the decorations I wanted to create-- letters and flowers in this case. 

Prep the tracing area-- place your printed guide sheets on cookie sheets, then cover the guide sheets/cookie sheets with waxed paper.

Melt the Candy-Quik in a heat-proof bowl in the microwave according to the directions on the package.  When warm and smooth, transfer the Candy-Quik to a pastry bag with a round tip (I used a Wilton #7 tip) or a baggie with a small part of a corner cut off.  Trace the printed guide sheets with the melted Candy-Quik.  While the Candy-Quik is still soft, sprinkle the letters/shapes with the round non-pareil sprinkles.  Let the monograms harden-- you can speed this process by refrigerating them. 


Vanilla Bean Cupcakes
(From Annie's Eats)
Makes 24+ cupcakes

Ingredients:
3 cups cake flour
1 Tbsp baking powder
1/2 tsp salt
1 vanilla bean, split lengthwise
16 Tbsp unsalted butter (room temperature)
2 cups sugar
5 large eggs (room temperature)
1 1/4 cup buttermilk (I made my own-- directions here)
1 Tbsp vanilla extract

Preheat oven to 350 degrees and line two cupcake pans.  In a medium bowl, combine and whisk together cake flour, baking powder, and salt.  In a large bowl, or the bowl of a stand mixer, add the butter and scrape the vanilla bean seeds into the same bowl.  Beat the butter and vanilla bean seeds on medium-high until light and creamy, about 3 minutes.  Scrape the sides of the bowl and beat for another minute.

Add the sugar to the butter mixture, 1/4 cup at a time, beating for 1 minute after each addition.  (I know, I know-- this part is annoying, but it makes a difference.  Just take the time to do it.)  Mix in the eggs one at a time, beating until incorporated.  Scrape the sides after each addition of egg.  Combine the buttermilk and the vanilla extract in a liquid measuring cup.  With the mixer on low speed, alternate adding the dry and wet ingredients, beginning and ending with the dry-- be sure to mix each addition only until just incorporated.  When finished, scrape the sides of the bowl and beat for an additional 15 seconds.

Fill each liner approximately 2/3 of the way full.  You will probably have extra batter-- I made about 12 mini cupcakes to go along with the 24 full-size cupcakes.  Bake for 18-22 minutes, or until a toothpick inserted in the middle comes out clean.  Cool the cupcakes in the pans for about 5-10 minutes, then transfer to a wire rack.

Vanilla Buttercream Frosting
(Adapted from Wilton)

Ingredients:
2 sticks unsalted butter
1 tsp vanilla extract (I use the clear, artificial stuff for this-- it keeps the color very white, and there's something about the taste of it in this frosting...(
4 cups powdered sugar
2 Tbsp milk

In a large bowl, or the bowl of a stand mixer, cream the butter.  Add the vanilla to the butter, mixing until incorporated.  Add the powdered sugar one cup at a time, scraping the sides after each addition.  Add milk and beat until frosting achieves desired consistency-- you may end up using more or less milk, depending on your frosting.  Frost cupcakes.

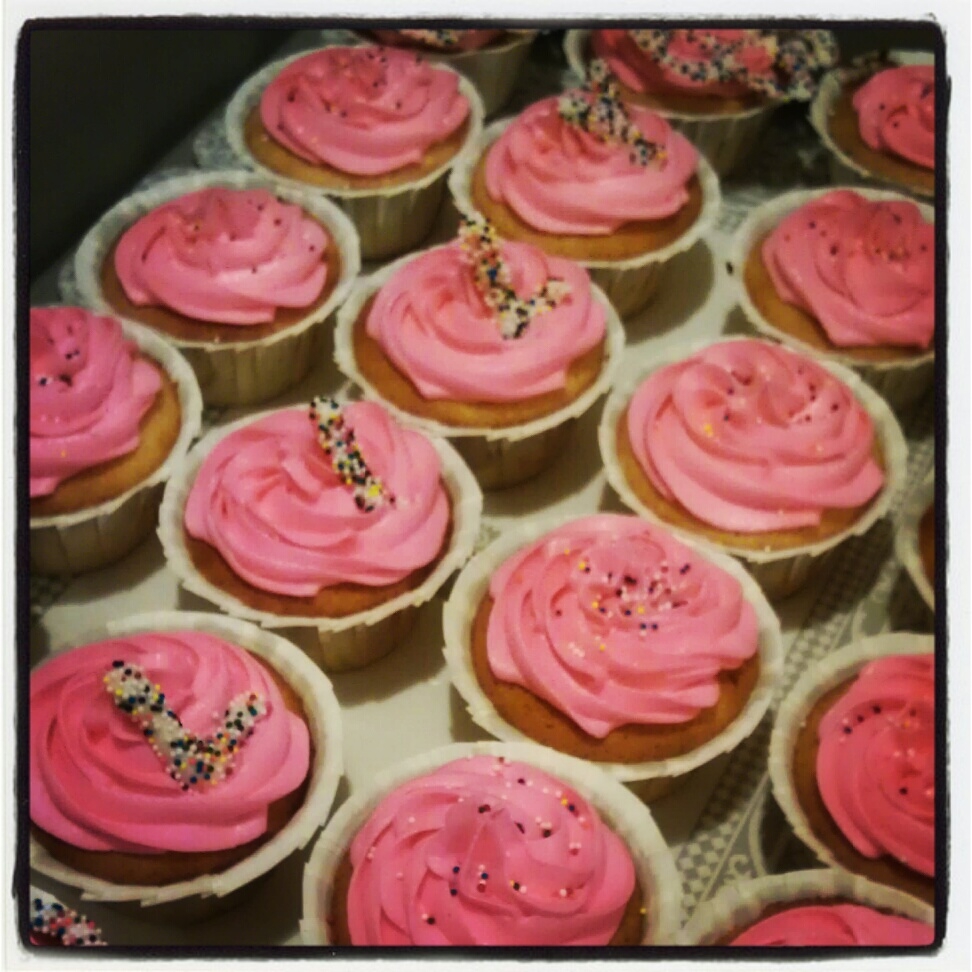
My cupcakes were for a girl's baby shower, soI tinted my icing pink with Wilton icing gel color and then frosted them using a pastry bag and a Wilton 1M tip.  I added the monograms at the end. 


Sunday, March 11, 2012

Bailey's Chocolate Cheesecake


So what did I do this weekend?  I ran a 15K.  Yes, that's right, a 15K.  That's 9.3 miles.

9.3 miles is a LONG way, in case you were wondering.

I am lucky to live in a city that is on the coast-- Jacksonville has a beach, a big river, and seven major bridges that cross that river.  The 15K that I was in is called the River Run, and in it, you run across two of those seven bridges.  You also spend some time running through some of the more picturesque neighborhoods that border the river-- or so they tell me.  When I run, I end up staring at my feet.  (Yes, I am aware that you aren't supposed to watch your feet.)  It's a pretty major event-- apparently, it's also the national championship race for the 15K, so there were upwards of 20,000 people running with me.  I should also probably point out that I didn't RUN the whole thing-- although I did run more of it than I thought I'd be able to.  When people asked me what my goal time was for the race, I laughed.  I had three goals for this race: 1) Not to die. 2) To cross the finish line. 3) To not be last.  Since I am here writing this, obviously I achieved goal 1.  Luckily, I also managed goals 2 and 3, so I'm a pretty happy camper!

Pre-race.  Also, at 7 am, pre-caffeine.  I was also ridiculously nervous.
I'm pretty dang proud of myself, as I'm sure you can tell.  But what's the point of a blog, if not to talk about yourself?  :)  I know, I know-- the cheesecake is the important thing here.  So-- this week I am planning to make Guiness and Bailey's cupcakes, and in consequence there is a whole bottle of Bailey's hanging out in my kitchen.  We went to my in-laws' house for dinner tonight, and I thought I'd make something else with the Bailey's, since I was dying to use it.  This cheesecake is incredibly easy-- and the great thing is that with the ganache on the top, it doesn't matter if it cracks when you bake it.  Mine was definitely cracked-- but you can't tell at all.  So, happy 15K, happy pre-St. Patrick's Day, and happy weekend!

Bailey's Chocolate Cheesecake
(Adapted from gimme some oven)
Makes one 9-inch cheesecake

Chocolate Crust
1 1/2 cups crushed Oreos (about half a package)
1/3 cup powdered sugar
1/3 cup unsweetened cocoa powder
4 Tbsp melted butter (1/2 stick), melted

Cheesecake
3 8-oz bricks cream cheese, softened
1 1/4 cups granulated sugar
1/4 cup unsweetened cocoa powder
3 Tbsp all-purpose flour
3 eggs
1/2 cup sour cream
1/2 cup Bailey's Irish cream liqueur

Ganache
4 oz semi-sweet chocolate
1/2 cup heavy cream

For the Crust:
Preheat oven to 350 degrees.  In a food processor, finely chop/crush the Oreos.  In a large bowl, stir together the Oreos, the sugar, and the cocoa powder.  Add the melted butter and stir until well combined. Press this mixture into the bottom of a greased 9-ince springform pan.  Bake at 350 for 10 minutes.  Set aside to cool.

For the Cheesecake:
Turn oven tempreature up to 450 degrees.  In a large bowl, or the bowl of a stand mixer, beat together the cream cheese, cocoa powder, and sugar until smooth.  Add eggs one at a time, mixing after each addition until well combined.  Add the sour cream and Bailey's liqueur, then beat until smooth.  Pour filling into baked crust in springform pan.

Note:  The original recipe here gives directions for a water bath to prevent cracks in the cheesecake-- it says to simply put a 9x13 glass pan of water in the oven, on the rack below the cheesecake, as it bakes.  I tried this, and still ended up with cracks.  Like I said, I wasn't too worried about it.  So try this if you want-- let me know if it works for you!

Bake the cheesecake at 450 for 10 minutes, then reduce temperature to 250 and continue baking for an additional 60 minutes. 

After removing the cheesecake from the oven, run a knife around the edge to loosen.  Let the cake cool before removing the outer edge of the springform pan. Pour the ganache over the top, then chill for a few hours before serving.

For the Ganache:
Place the 4 oz of semi-sweet chocolate in a heat-proof bowl (I've found that a large glass measuring cup is ideal for this).  In a small saucepan, heat the cream until almost boiling, then pour over the chocolate.  Let this sit for at least 30 seconds, then whisk together the cream and chocolate.  Pour over the top of the cheesecake.  If you have bubbles in the ganache, use a toothpick to pop them.

Not my best pictures, but you get the idea. :)

Sunday, March 4, 2012

Carrot Cake Cookies


I know what you're thinking-- "What??  It's not a cupcake??"  Don't get excited-- this is basically a cupcake...in cookie form.  When I was making this, I was thinking of the Little Debbie Oatmeal Cream Pies-- you know, the ones with white plastic-y "cream" in the middle?  We love those.  We also love the white, plastic-y Christmas Tree Cakes that you can only get in December.  As much as I bake, we can't seem to get away from buying the Christmas Tree Cakes at least once during the holidays.  So I was hoping that these would be a yummier, less plastic-y version of the Oatmeal Cream Pies, except with carrot cake instead of oatmeal (which basically makes them nothing like the Little Debbies, but I digress...).  I was also thinking of the cookies in the Publix bakery, the ones that are glued together with OBSCENE amounts of icing-- you know what I'm talking about.  The ones you always want to buy but can't because a) you aren't 10, b) you are afraid the bakery people, cashier, and all the other store patrons would judge you, and c) MyFitnessPal would explode if you tried to enter the number of calories in one of those suckers.  Yeah, those cookies.  Well, these carrot cake cookies are the grown-up version of the Little Debbies and the Publix cookie sandwiches.  No one will judge you if the cookie has carrots in it, right?  Tell MyFitnessPal to kick rocks and make these.  Your inner child will thank you. :)

Carrot Cake Cookies with Cream Cheese Icing
(Inspired by/adapted from In Praise of Leftovers)
Makes 12 sandwich cookies

Note: I made the cookie part of these dairy-free for the girly.  Just sub Willow Run margarine (or whatever other non-dairy margarine you have) for the butter. 

Carrot Cake Cookies
1 1/8 cup all-purpose flour
1 tsp cinnamon
1/2 tsp baking soda
1/2 tsp salt
1 stick (8 Tbsp) unsalted butter, softened
1/3 cup + 2 Tbsp light brown sugar
1/3 cup + 2 Tbsp granulated sugar
1 large egg
1/2 tsp vanilla extract
1 cup coarsely grated carrots (about 2 carrots)
1/2 cup chopped pecans, lightly toasted
4 Tbsp raisins

Preheat oven to 375 degrees and line baking sheets with parchment paper.  If you don't have parchment paper, be sure to butter your baking sheets generously.  (Also, consider in investing in some parchment paper!)

In a medium bowl, whisk together the flour, cinnamon, baking soda, and salt.

In a large bowl, or the bowl of a stand mixer, beat together the butter, sugars (both brown and granulated), egg, and vanilla.  Beat until pale and fluffy (approximately 2 minutes), then add in the carrots, nuts, and raisins.  Once those have been thoroughly mixed in, add the flour mixture and beat until incorporated.

Drop about 1 1/2 Tbsp of dough onto cookie sheets, about 2 inches apart (these cookies spread-- you have been warned).  Bake at 375 for 12-16 minutes, rotating baking sheets halfway through baking.  Once removed, cool on baking sheets for about a minute, then transfer to wire racks to finish cooling.  Cool and then frost to create sandwiches.

Cream Cheese Icing
4 oz (1/2 stick) of unsalted butter
4 oz (1/2 brick) of cream cheese
1/4 tsp vanilla extract (I use the clear kind here to save the white color)
1/4 tsp almond extract
1 3/4 to 2 cups powdered sugar

In a large bowl, or the bowl of a stand mixer, beat together the butter and cream cheese.  Scrape the sides of the bowl, then add the vanilla and almond extracts.  Beat until the extracts are incorporated, then scrape the bowl again.  Add the powdered sugar one cup at a time, scraping after each addition.  Add powdered sugar to increase the stiffness of the icing, or milk to decrease the stiffness.  Spread or pipe icing onto the flat side of one cookie, then top by pressing the flat side of an unfrosted cookie onto the icing. 

Monday, February 20, 2012

Almond Raspberry Cupcakes with Cream Cheese Frosting


My husband loves the show The Walking Dead.  I really want to like it, but it totally creeps me out.  I can only watch it out of the corner of my eye-- so I'm blogging about cupcakes and sneaking glances at the screen while he watches.  I'm also pretending that I'm not crying my eyes out over one of the story lines-- who knew that I would sob like a baby over zombies?  Zombies scare the mess out of me.  These cupcakes are, strangely, very appropriate to death and violence.  I've made them twice-- once for a friend's birthday, and again for my bookclub.  We read Heartsick by Chelsea Cain, a novel about a female serial killer who carves hearts into her victims (among other things...), so I called these "Bleeding Heart" cupcakes and piped little pink hearts on the top of them.  Yay for making serial killers cute!


Besides being appropriate for gore and death, these cupcakes are delicious.  I brought them to work, where they netted me a marriage proposal.  No joke.  They stay moist and yummy and the cream cheese frosting is fantastic.  The raspberry filling is great too-- however, the recipe makes a LOT of filling.  I used about half and froze the rest.  When I defrosted the filling, it was definitely a lot more runny than when I initially made it, and I was afraid that it would make the cupcakes soggy, so I used a fork to fill the cupcakes in an attempt to get less of the liquid and more of the filling.  It seemed to work pretty well-- the cupcakes didn't seem to suffer and everyone enjoyed them! 

Almond Cupcakes
(Adapted from Good Thymes and Good Food)
Makes approx 12 cupcakes

1 1/3 cups all-purpose flour
1/2 tsp baking soda
1/2 tsp baking powder
1/4 tsp salt
1 cup sugar
1/4 cup butter (at room temp)
1 egg (at room temp)
1 tsp almond extract
1/4- 1/2 tsp of vanilla extract
1 cup buttermilk*

*I usually make my own buttermilk-- combine 1 cup milk plus 1 Tbsp vinegar, and let it set about 10 min.

Preheat oven to 350 degrees.  Stir together dry ingredients (flour, baking soda, baking powder, and salt) in a medium bowl.  In a large bowl, or the bowl of a stand mixer, beat the butter and sugar until it is light and fluffy.  Beat in the egg, almond, and vanilla extracts until thoroughly combined.

Alternate adding the flour mixture and the buttermilk, beginning and ending with the flour (I did three additions of flour and two additions of buttermilk.)

Line a cupcake tin with liners.  Fill each liner about 2/3 of the way full.  Bake for 18-20 minutes, or until toothpick/tester inserted in the middle of the cake comes out clean.  (The tops should be a nicce brown color, not too light.  My surface-of-the-sun oven took the whole 18 minutes to fully bake these.)  remove from oven and cool on a wire rack.  When the cupcakes are cool, core them in preparation for filling.

Raspberry Filling
(Adapted from Wilton)
Makes about 2 cups of filling

1 pkg (12 oz) frozen raspberries
1/3 cup sugar
3 Tbsp corn starch
1 tsp lemon juice

Defrost raspberries, then drain, reserving juice (it's a good idea to drain the juice into a liquid measuring cup).  Add enough water to juice to equal 1 1/4 cup total liquid.  In a medium saucepan, combine the liquid, sugar, corn starch, and lemon juice.  Heat and stir until liquid boils and thickens.  Cool completely, then stir defrosted raspberries into the mixture.  Fill the cupcakes.

Almond Cream Cheese Icing
Note: this recipe makes juuuust enough to frost the 12 cupcakes.  If you like extra icing, you'll want to make more than what's listed here!

4 Tbsp butter (at room temp)
4 oz cream cheese
1/2- 3/4 tsp almond extract
2-3 cups powdered sugar

In a large bowl, or the bowl of a stand mixer, beat butter and cream cheese until well-combined.  Add almond extract and mix until incorporated.  Add the powdered sugar, one cup at a time, until icing reaches desired consistency.


Sunday, January 29, 2012

Chocolate Malt Cupcakes with Marshmallow Filling


I have a problem.  I literally cannot go a week without baking.  Last week, I thought I was going to be able to go without making something-- I had to work all day Saturday and on Sunday I decided to start training for the 9K I signed up for in March (I have obviously lost my mind).  I was tired, I was sore...and yet the oven was calling my name.  Luckily, I had ingredients on hand to make dairy-free brownies for little miss.  This weekend, it's cupcakes.  The people at work are going to hate me tomorrow at lunch. :)


These are, for the most part, very modest cupcakes.  There's no hugely in-your-face flavors-- the frosting is very sweet and chocolatey, but it's balanced by a really mild chocolate cake and the very light marshmallow cream in the middle.  I didn't love the marshmallow cream for this-- it's good, but I think I can find a better recipe for the next time.  I had to doctor it quite a bit to get it to actually taste like anything.  Also, I made a half recipe of cupcakes and a whole recipe of frosting and had WAAAAY too much left over.  I've halved the frosting recipe below, so you won't have an insane amount at the end, like I did. 

Chocolate Malt Cupcakes with Marshmallow Cream Filling
(Inspired by recipe from The Pastry Affair)

Chocolate Malt Cupcakes
(From Martha Stewart's Cupcakes)
Makes approximately 15 cupcakes

1 1/8 cup all-purpose flour
3/8 cup unsweetened cocoa powder
1/4 cup granulated sugar
3/8 cup packed light-brown sugar
3/4 tsp baking soda
1/4 tsp salt
1/2 cup milk
5/8 cup malted milk powder
1/2 cup vegetable oil
1 1/2 eggs
1/2 cup sour cream
1/2 tsp pure vanilla extract

Preheat oven to 350 degrees.  In a large bowl, or the bowl of a stand mixer, whisk together the flour, cocoa powder, both sugars, baking soda, and salt.  In a large liquid measuring cup, whisk together the milk and malted milk powder until powder is dissolved.

Add the oil and the milk mixture to the flour mixture in the bowl.  Beat until combined.  Add eggs one at a time, beating until  incoporated.  Scrape the bowl as needed.  Add sour cream and vanilla, and beat until just combined.

Line the cupcake pans with liners.  Fill each halfway (these cupcakes definitely rise!) and bake for approximately 20 minutes, rotating halfway through.  Cupcakes are done when a toothpick/cake tester inserted in the middle comes out clean. 

Allow the cupcakes to cool on a wire rack, then core the cupcakes in preparation for filling.

Toasted Marshmallow Filling
(Adapted from The Pastry Affair)

8 large marshmallows
3/4 cup marshmallow fluff
1/2 cup vegetable shortening
3/4 cup confectioners sugar
2 1/4 tsp vanilla extract

Place marshmallows on a baking sheet lined with parchment paper.  Broil until golden brown.  Watch carefully!  You don't want burned marshmallows-- good on s'mores, but not so good in filling.

In the bowl of a stand mixer, combine toasted marshmallows, fluff, vegetable shortening, sugar, and vanilla extract.  Beat on medium-high speed until light and fluffy.  Add more sugar, vanilla, and fluff to taste, if necessary. 

Fill the cored cupcakes with the marshmallow filling.

Chocolate Malt Frosting
(From The Curvy Carrot)

1 stick unsalted butter, at room temperature
1 tsp vanilla extract
1/8 tsp salt
2 cups confectioners sugar
1/2 cup unsweetened cocoa powder
1/2 cup malted milk powder
5 Tbsp milk

In a large bowl, or the bowl of a stand mixer, combine butter, vanilla, and salt.  Beat at medium-high speed until light and fluffy.

In a separate bowl, whisk together the confectioners sugar, the cocoa powder, and the malted milk powder. 

Add the dry ingredients to the butter in three additions.  Beat until incorporated, then add the milk following each addition of the dry ingredients.  Scrape the bowl as needed, making sure that the dry ingredients are thoroughly mixed.  Beat until smooth and creamy.  Frost the filled cupcakes, using an offset spatula, bag and star tip, or a ziploc with the corner cut off. 

Garnish, if desired, with Whopper candies.


Monday, January 16, 2012

Salted Caramel Cupcakes


I love caramel.  I mean, I LOOOOOOOOOOOOOOOOOVVVVEEEE caramel.  I love the fact that I can make my own caramel now and it tastes so much better than store-bought caramel-- not that I would ever turn up my nose at the store-bought stuff.  Caramel can be scary to make, though.  I have only ever made caramel using the "wet" method, where you add water to the sugar as you initially cook it.  The "dry" method still freaks me out-- cooking just sugar in a pot on the stove?  To me, that sounds like a recipe for disaster, burnt sugar, and a ruined pot.  This caramel, however, is YUM.  My husband almost made himself sick eating the leftover caramel out of the pot.  You really should try it-- people freak when they find out you can make caramel. Everyone is Very Impressed with that skill.


I made my own caramel for these, obviously-- for the filling and the icing.  I was also able to use the fleur de sel that I got for Christmas, which was fun.  These are super-good cupcakes.  I was impressed that the cake isn't too heavy-- it's nice and light, so it doesn't overpower the other flavors-- and you really can taste the salt in the caramel filling and the icing, especially on day two.  I will tell you that next time I make these, I will use foil liners-- the caramel makes the already-moist cupcake even more moist on the bottom (you can see it a little bit in the first picture). 

Chocolate Salted Caramel Cupcakes
All recipes from 20Something Cupcakes
Makes 20-24 cupcakes

Chocolate Cupcakes

1 1/2 cups all-purpose flour
3/4 cup unsweetened cocoa powder
1 1/2 cups sugar
1 1/2 tsp baking soda
3/4 tsp baking powder
3/4 tsp salt
2 large eggs
3/4 cup buttermilk*
3 Tbsp vegetable oil
1 tsp vanilla extract
3/4 cup warm water

*I very rarely buy buttermilk, mostly because I know I won't use it all.  If you don't have buttermilk on hand, you can make your own by adding 1 Tbsp vinegar to 1 cup milk.  It will curdle and look gross and perfectly substitute for buttermilk.

Preheat oven to 350 degrees and line two cupcake pans.  In a large bowl or the bowl of a stand mixer, combine flour, cocoa powder, sugar, baking soda, baking powder, and salt.  Whisk these dry ingredients until combined.  With mixer on low speed, add the eggs, buttermilk, vegetable oil, vanilla extract, and water.  Beat until combined.  NOTE:  This batter is super-thin.  I was really worried-- I thought I had messed it up when I first mixed it.  From this point, the original recipe says to "spoon the batter" into the cupcake liners, but I couldn't do that-- the batter was too thin.  Instead, I poured it into a 4-cup liquid measuring cup and literally poured the batter into the liners.  I would suggest that you do that rather than trying to spoon it in.  Bake at 350 for 15-17 minutes, or until cake tester (toothpick) inserted comes out clean.  Cool for 10 minutes in the pans on wire racks; after 10 minutes, remove from pans to continue cooling.  When cool to the touch, core each cupcake (instructions here). 

Salted Caramel
(For filling and icing)

2 1/2 cups sugar
2/3 cup water
1 Tbsp light corn syrup
3/4 cup heavy whipping cream
2 1/2 tsp flaked sea salt-- use fleur de sel, if you have it

NOTE:  Caramel is weird and finicky.  I will give you the original recipe here, as well as my experiences making this particular recipe. 

Heat sugar, water, and corn syrup in a heavy saucepan over medium-high, stirring occasionally, until syrup is clear. Clip a candy thermometer to the side and stop stirring.
(My syrup did not get clear.  When the syrup began to boil, I stopped stirring.  Once it boiled for a few minutes, then it got clear.  Also, I do not own a candy thermometer.  You don't need it to make caramel.)

Cook until syrup comes to a boil, washing down sides of pan with a wet pastry brush as needed. Boil, gently swirling pan occasionally, until mixture is caramelized and just reaches 360°F.
(I don't wash down the sides of my saucepan.  You will need to watch your caramel carefully-- plan to devote about 10-15 minutes to hanging over the stove, watching it boil.  When the mixture becomes a nice amber color, then it's done.  Again, I would recommend that you don't leave your caramel unattended.  It will burn very quickly!  Also, don't get freaked out and take it off too early-- let it get to the amber color.)

Once your caramel is amber in color, remove from heat and slowly pour in cream; stir with a wooden spoon until smooth. Stir in sea salt.
(Pour in the cream slowly and carefully!  Do not pour it in all at once- your caramel will seize and harden.  Also, please be careful-- the caramel gets very angry and spits and bubbles and hisses when you pour the cream in.  Just keep stirring and slowly adding the cream.)

Let the caramel cool for 15-20 minutes, then fill each cored cupcake with caramel.  Sprinkle a few flakes of fleur de sel on top the caramel before replacing the cupcake top.

Salted Caramel Buttercream
1 stick unsalted butter
1/2 cup Crisco (or you can substitute another stick of butter here)
1/2 tsp flaked sea salt/fleur de sel
1 tsp vanilla extract
3-4 cups powdered sugar
1/2- 3/4 cup caramel (from above)

In a large bowl, or the bowl of a stand mixer, cream together the butter, Crisco, and sea salt until combined.  Add the vanilla extract and beat until absorbed.  Next, add the powdered sugar one cup at a time, beating until absorbed-- scrape the sides of the bowl after each addition.  (I used about 3.5 cups.)  Scrape the bowl again and add the half cup of caramel-- beat until incorporated.  If you want a more intense caramel flavor, add more, beating each addition until well-combined.  If your frosting seems soft, you can refrigerate it until it sets-- the caramel may make it soft, especially if it was warm when added. 

Using a pasrty bag with a tip (I used a large start tip) or a ziploc with the corner cut off, frost each cupcake.  Garnish each cupcake with a few flakes of the sea salt.  Store in a covered container at room temperature.