Sunday, December 11, 2011

Brownie Cookies


Oh man.  Christmas baking is in full swing these days.  And by full swing, I mean I am baking basically every day.  EVERY DAY.  Even for me, this is a new record.  The part that is coolest to me is that I've had requests to create desserts for special occasions...and get paid to do it.  What?  People want to give me money to do this??  It's so exciting for me.  This weekend was my first paid occasion-- it was cupcakes for a friend's son's birthday, not the cookies pictured above-- and I was so honored by her request.  It's a big deal to me that people trust my abilities enough to provide baked goods for their special occasions-- a really big deal.  The cupcakes, by the way, turned out really well, and apparently the birthday boy told his mom-mom that his favorite part of the party was the cake. :)  He is too cute for words.

Not to change the subject, but the cookies above are EVIL.  They are moist and chocolate-y and small enough that you don't realize that you've eaten twelve of them before it's too late.  True story-- one of my friends came into my classroom to sample them.  I was teaching, so he took the container into the storage closet in order to keep from disturbing my class.  He came out two minutes later, wiping his mouth, with a guilty expression on his face, and confessed that he'd eaten four, and that I needed to take them away from him before he ate the rest.  I think that speaks for itself as a testament to how good these cookies are.  Make them and give them to your friends-- they will thank you! Or hide in your closet-- either way, you should take it as a compliment. :)

Brownie Cookies
(From Pure and Yummy)
Makes approximately 4 dozen cookies

1/2 cup butter
4 ounces of unsweetened chocolate, coarsely chopped
3 cups semisweet chocolate chips (divided in half)
1 1/2 cups all-purpose flour
1/2 tsp baking powder
1/2 salt
4 large eggs
1 1/2 cups sugar
2 tsp vanilla extract

Prehear oven to 350 degrees.  Combine unsweetened chocolate, 1 1/2 cups of chocolate chips, and butter in a medium saucepan.  Cook over low heat, stirring constantly, until all ingredients are melted and smooth.  Remove from heat and let cool. (Note: Do not refrigerate this to try to cool it more quickly-- it needs to stay in a liquid-y state.)

In a small bowl, combine flour, baking powder, and salt-- set aside. 

In a large mixing bowl, or the bowl of a stand mixer, beat the eggs, sugar, and vanilla until thoroughly combined.  Gradually add the flour mixture to the butter mixture, beating until well incorporated.  Next, add the melted chocolate mixture and beat well.  Stir in the remaining 1 1/2 cups chocolate chips. 

Drop teaspoonfuls of dough onto cookie sheets (use your parchment paper!) approximately 1 inch apart.  You may need to refrigerate your dough for 10 minutes or so in order for it to be easier to work with.  Also, if you have a cookie scoop, this is an ideal dough to use it with.  Bake for approximately 10 minutes, or until the tops crack like brownies.  Remove from oven; cool on the cookie sheets for a few minutes, and then transfer to wire racks to finish cooling. 

Merry Christmas from the cookie penguin!

Tuesday, November 29, 2011

Peanut Butter Kiss Cookies


These cookies are the direct result of a ridiculous lunch time conversation with my work friends.  I asked for cookie requests, since the holiday season is upon us and I'm going to be compulsively baking anyway, and somehow we ended up at....baking porn.  Yes, baking porn.  Don't ask me how-- it just happened.  This is the best part about being a teacher-- knowing that there are other adults in the building makes the bad days better and the good days that much more enjoyable.  I feel incredibly lucky to work with so many people who I respect and whose company I genuinely enjoy.  So, friends-- these cookies are for you!

Also, since it looks like I'm doing a decent job of keeping up with the blogging thing, I'm trying to get more involved with some of the online events that I read about.  I am submitting this recipe to an online cookie swap put on by one of the blogs I read.  If you're interested, you too can come join the fun at the My Baking Addiction and GoodLife Eats Holiday Recipe Swap sponsored by OXO.

Peanut Butter Kiss Cookies
(From The Better Homes and Gardens 100 Best Cookies 2011)

1/2 cup shortening
1/2 cup peanut butter
1/2 cup granulated sugar + 1/4 cup for rolling dough
1/2 cup packed brown sugar (either light or dark)
1 tsp baking powder
1/8 tsp baking soda
1 egg
2 Tbsp milk (I used almond milk)
1 tsp vanilla
1 3/4 cups all-purpose flour
Approximately 50 Hershey's kisses (about 1 bag's worth)

Preheat oven to 350 degrees.  In a large bowl, or the bowl of a stand mixer, cream the shortening and the peanut butter.  (Tip: Spray the measuring cup for the peanut butter with Pam- it helps the peanut butter slide right out.)  Add the 1/2 cup granulated sugar, the brown sugar, baking powder and baking soda and mix until combined, scraping the sides of the bowl.  Beat in the egg, milk, and vanilla until combined.  Add the flour and beat until combined-- you will need to scrape the sides and bottom of the bowl to make sure that flour is completely incorporated.

Place the reserved 1/4 cup of granulated sugar in a shallow bowl.  Shape the dough into 1-inch balls, roll the dough balls in the sugar, and then place them about 2 inches apart on an ungreased cookie sheet (use your parchment paper here!).  Bake for 10-12 minutes, or until the edges are firm and set, and the cookies are starting to slightly brown.  While the cookies are baking, unwrap the Hershey's kisses so they can be ready to go.  As soon as you remove the cookies from the oven, press a Hershey's kiss into the top.  Let the cookies/kisses set for a few minutes and then transfer to wire racks to cool.

Dairy-Free Modifications:  Use almond milk as noted above, and substitute the Hershey's kiss for about 3 Ghirardelli's semi-sweet chocolate chips.

Saturday, November 26, 2011

(Vegan) Apple Pie


I am so thankful. 

There are so many things for me to be thankful for that I cannot even begin to list them all.  I can't even make the attempt.  I am thankful beyond words or measurement or even belief.  We'll leave it at that.

Instead, I will tell you about pie.

Pie is scary to me-- specifically, pie crust.  I don't like things that involve the rolling pin because the rolling pin still makes me frustrated (it sticks to my dough, I end up using too much flour, etc.) and pie crust basically exemplifies that for me.  But wait!  Enter little miss and the milk allergy.  For her second Thanksgiving, I decided I wanted to make an apple pie that she could eat, so I turned first to the trusty Better Homes and Gardens red cookbook.  In it, I found the answer to all my pie crust problems.  It's the Easy Oil Pastry recipe, easily adapted to be dairy-free (or not, depending on your preference).  No rolling pin required, and because it's just a single crust recipe, you get to cover the pie with the yummy crispy streudel-y stuff.  I've made this pie for three Thanksgivings now, and every year, people comment on how good it is.  As an added bonus, the dairy-free substitutions for this pie also make it vegan.  As mama to the dairy-free child, I always appreciate it when people publicize information and recipes that are (or can be adapted to be) diet-specific.  Don't be fooled though-- there is no difference in taste here!  It is homemade apple pie at its finest.  Happy Thanksgiving season!

Easy Oil Pastry (for the bottom crust)
(From The Better Homes and Gardens Cookbook, 12th Ed.)
Makes one crust

1 1/4 cups all-purpose flour
1 Tbsp sugar
1/4 tsp salt
1/4 cup cooking oil (I used vegetable oil)
3 Tbsp milk (I used almond milk here; I've also used soy in the past. Both work well.)

In a medium bowl, stir together flour, sugar, and salt.  Add oil and milk all at once-- the easiest way to do measure the oil into a larger measuring cup and add the milk to the oil, then dump all the liquid in at one time.  Stir lightly with a fork until combined.  Form the dough into a ball with your hands.  Transfer dough ball to an ungreased 9-inch pie plate-- glass or dull metal works best.  Press the dough onto the bottom and up the sides of the pie plate.  You're ready to fill!


Apple Pie
(From The Better Homes and Gardens Cookbook, 12th Ed.)

For filling:
6 cups peeled and thinly sliced cooking apples (I use Granny Smith-- about 5-6 apples worth)
3/4 cup cugar
2 Tbsp all-purpose flour
1/2 tsp ground cinnamon
1/8 tsp ground nutmeg

For topping:
1/2 cup all-purpose flour
1/2 cup packed brown sugar
3 Tbsp butter (I used vegetable oil margarine-- Willow Run)

Preheat the oven to 375 degrees.  In a large bowl (seriously-- use a big one), combine the sugar, flour, cinnamon, and nutmeg.  Add the apple slices and toss until coated.Transfer the apple mixture to the prepared pie crust.

For the topping, stir together the flour and brown sugar.  Cut the butter/margarine into the flour-sugar mixture using a pastry cutter (if you have one) or a fork until the mixture looks like coarse crumbs.  Even sprinkle the topping over the crust and filling.


You will need to cover most of the pie so that the topping doesn't brown too quickly.  Cut a piece of tin foil that will cover the whole pie.  Next, fold it in half and cut a small-ish circle in the middle (2 to 2 1/2 inches).  Unfold the tinfoil and place it over the pie with the circle in the middle. 


Place the pie on a cookie sheet in case it bubbles over as it cooks.  Bake the pie for 40 minutes with the tin foil on it, then take off the tin foil and bake for another 20 minutes (one hour total).  Cool on a wire rack.

I hope that your Thanksgivings were as wonderful as mine!  Also-- get ready.  Here come the Christmas cookies!!

Wednesday, November 16, 2011

Snickerdoodles

Ana says, "Look! I didn't burn them!  I bet Lenin couldn't bake cookies."
This is Ana.  Ana's hair is a very accurate gauge of her personality.  Ana is not allowed to operate heavy machinery (she is, however, allowed to ride a scooter).  Ana and her husband love snickerdoodles, and because I love Ana, I let her operate the KitchenAid-- under strict supervision, of course.  (We won't talk about the fact that she tried to put the spatula in the KitchenAid while it was running.)  Ana made these cookies all by herself!  She cracks a mean egg.  :)

Snickerdoodles are not my personal favorite, but everyone around me seems to loooooove them.  Don't get me wrong-- they are good, all buttery and cinnamon-y, but give me caramel or toffee every time over cinnamon.  These are very simple cookies, but they always get rave reviews.  It's also very easy to substitute the dairy-free margarine in these cookies with really good results-- I make these for baby girl every year.  Also, this was the first time I baked with friends-- it was a blast and I will definitely let Ana use the heavy kitchen equipment again. :)

Snickerdoodles
(Recipe from The Better Homes and Gardens Cookbook)

1/2 cup butter, softened
1 cup sugar
1/4 tsp baking soda
1/4 tsp cream of tartar
1 egg
1/2 tsp vanilla
1 1/2 cups all-purpose flour

To roll cookies (approximate measurements):
1/8 cup sugar
2 tsp cinnamon (or to taste)

Preheat oven to 350 degrees.  In a large bowl, or the bowl of a stand mixer, beat butter for approximately 30 seconds.  Add the sugar, baking soda and cream of tartar and beat until combined-- scrape the sides of the bowl as necessary.  Beat in the egg and vanilla until combined.  Add the flour, beating until incorporated.

NOTE:  At this point, the original recipe says to chill the dough for about an hour.  I have NEVER let the dough chill and the cookies always turn out perfectly.  So, this is optional.  If you want to let the dough chill so it's easier to handle, feel free.  If you don't have that kind of time, that's no problem-- just skip ahead.  (You overachiever, you.)

Mix together the sugar and cinnamon to roll the cookies.  Put parchment paper on the cookie sheets (and if you don't have parchment paper, GET SOME-- that is not optional).  Roll the dough into approximately 1-inch balls and then roll the dough balls in the cinnamon-sugar mixture until fully coated.  Place the dough balls about 2 inches apart on the cookie sheet.  Bake for approximately 10-11 minutes (be sure to check your oven-- mine is like the surface of the sun, so the cookies were done in 8 minutes).  Let cookies cool on a wire rack.


Cinnamon-y goodness!
Confusion.
(This was supposed to be the better picture. In some ways, it is.)

Tuesday, November 15, 2011

Cookies and Cream Cupcakes

These are yummy. :)  I made them as a dairy-free dessert for little miss-- we were attending my husband's grandfather's 80th birthday party, and they only had a bakery cake, which is a big no-no for my poor little allergy girl.  I was really happy with how well these cupcakes turned out-- they were a last minute recipe that I kind of cobbled together, but it all worked out.  It's not a very "fall-like" recipe, but the frosting got rave reviews from my resident icing connoisseur-- my husband. I made these in two different forms-- large and miniature.  Both forms are equally good.  The cake base is the chocolate cake I posted for the chocolate espresso cupcakes, so I won't repeat it here, but I will link you to it.  That chocolate cake recipe is definitely the best I've ever found.  Pretty easy and definitely good enough to make again!

Chocolate Cupcakes
From Annie's Eats via Coley Creates
Makes approximately 24 mini cupcakes and 10 full-size cupcakes

Additional ingredient: 1 package miniature Oreos

Use the link to access the chocolate cake recipe.  Once you've mixed the batter for the cupcakes, line the the pan size of your choice with cupcake liners.  For the mini cupcakes, I twisted off the top of the mini Oreo and placed the bottom half of the cookie, icing side up, in the bottom of each cupcake well.  (Save the tops to crush for the icing.)


Fill each of the cupcake wells a little more than halfway full-- you don't want the cupcakes to overflow!  Reserve approximately 10-15 of the whole mini Oreos as decoration for your full-size cupcakes.  Roughly chop the rest of the mini Oreos in half and add to the remaining batter.  Fill as many of the full-size cupcake wells as you can, filling to about half to two-thirds of the way full.  Bake at 350 degrees for approximately 16-20 minutes-- until a toothpick inserted in the cake comes out clean.  Cool on a wire rack as you make the icing.

Cookies and Cream Buttercream
(Adapted from Wilton and My Baking Addiction)

1/2 cup vegetable shortening (Crisco!)
1/2 cup unsalted butter (I used Willow Run margarine as a dairy-free sub)
1 tsp clear vanilla extract
4 cups powdered sugar
2 Tbsp milk (I used almond milk as a dairy-free sub)
1/2 cup (approximately) of crushed Oreos, without icing

In a large bowl, or the bowl of a stand mixer, cream together the shortening and butter until smooth.  (As always, if Crisco freaks you out, you can use all butter.)  Mix in the vanilla extract.  Add the powdered sugar on cup at a time, mixing until thoroughly incorporated and scraping the sides of the bowl after each addition.  The icing will appear very dry-- add the milk, 1 Tbsp at a time, until the icing reaches the consistency you want.

Crush the Oreos-- you can do this by hand or in a food processor.  I prefer the food processor, because it crushes the cookies very finely, which is is necessary if you are going to pipe the icing-- you need to make sure all the bits are small enough to fit through the icing tip.  Fold the crushed cookies into the icing-- this can be done to taste.  If you want more or less cookie bits, go for it!  It's your icing.  Pipe onto the cooled cupcakes with a bag/tip, or with the a plastic bag with the corner cut off.


It's about to be baking extravanganza time around these parts-- Friends-giving, the preschool Thanksgiving Feast, and my first ever "catering" request(!)-- I will try to keep you updated on all of it. :)

Thursday, November 3, 2011

Low-Cal Buffalo Chicken Dip


This week, I have been hungry.  All I want to do is eat and eat and eat and eat and...well, you get the picture.  Basically, if it's not tied down or moving real fast, I want to put it in my mouth.  I'm not kidding.  I have (in my own opinion) done a stellar job of not consuming everything in sight, and also not making stuff that I will be tempted to consume.  However, I reached my breaking point today.  My college team is playing tonight (go Noles! Currently spanking Boston College, in case you were wondering) and I just couldn't take it.  So while I was at the gym, I made the command decision-- we are having SOMETHING to eat during the game tonight.  I immediately thought of this dip.  One of my friends brought it to a party we attended earlier this fall and I was shocked at how good it tasted and how few calories it had for a cream-based dip (68 calories for 1/4 cup).  It's pretty zippy-- if you aren't into things that are warm, you may want to decrease the amount of hot sauce that you add.  Guess what-- I'm not hungry anymore. :)

Low-Cal Buffalo Chicken Dip
(from Hungry Girl-- ironic, right?)

1 8-ounce package non-fat cream cheese, softened
1/2 cup Frank's RedHot Original Cayenne Pepper Sauce (depending on taste)
1/2 cup 2% or part-skim shredded mozzerella cheese
1/4 cup fat-free ranch dressing
1/4 cup fat-free Greek yogurt (I used Fage 0%)
2 10-ounce cans white meat chunk chicken in water, drained

Heat oven to 350 degrees.  Put softened cream cheese in a bowl and stir until no lumps remain.  Add Frank's sauce, mozzerella cheese, ranch dressing, and Greek yogurt.  Stir until thoroughly mixed.  Add the drained chicken and stir until evenly distributed throughout dip.  Spoon evenly into an 8x8 baking dish.  Bake in the pre-heated oven for approximately 20 minutes, or until cheese is melted and dip is heated through.

NOTE:  This dip is yummy, but disconcertingly pink, especially before it's baked.  Don't let that put you off.  It's really good.
 

Tuesday, November 1, 2011

Chocolate Cupcakes with Espresso Buttercream and Chocolate Ganache


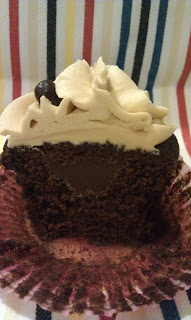
These might be the best cupcakes in the world.  I don't usually like to call attention to things that I do well (which seems a contradiction in terms when posting on a blog, but oh well), but I am not afraid to tell you that these. are. AWESOME.  They are the most requested thing for me to make, all the time.  When I make them, my husband hangs over my shoulder and tries to lick both the batter bowl and the icing bowl-- before I'm even done.  Like most of the cupcakes I make, these guys are multi-step, but none of it is very difficult. (If you scroll to the bottom of this post, there's a picture of the filled inside of the cupcake too.)  Also, the chocolate cake has become my go-to recipe-- it's so pretty and tasty.  I've adapted this recipe to make mini cupcakes, a small birthday cake, and cupcakes without the ganache-- it's nice and versatile.  These are good, friends-- you should try it! :)

Chocolate Cupcakes
(Recipe from Annie's Eats)
Makes approximately 18+ cupcakes

9 Tbsp unsweetened cocoa powder
1 1/2 cups cake flour (please actually use cake flour-- it makes a difference)
1/2 tsp salt
1 tsp baking soda
1/4 tsp baking powder
8 Tbsp (1 stick) unsalted butter, at room temperature
1 1/2 cups granulated sugar
2 large eggs
1/2 cup strong coffee
1/2 cup milk (either whole or 2%)

Pre-heat oven to 350 degrees.  Sift together the cocoa powder, cake flour, salt, baking soda, and baking powder.  In a large bowl, or the bowl of a stand mixer, blend the butter and sugar on medium-high speed, until fluffy (about 4-5 minutes).  Add the eggs one at a time-- scrape the bowl after you add each egg.  Combine the coffee and milk in a liquid measuring cup.


Add half the dry ingredients to the sugar/butter and mix until just incorporated.  Next, add the coffe-milk mixture and stir until combined-- the batter will look pretty runny at this point.  Add the remainder of the dry ingredients and mix until just incorporated.  Spoon batter into cupcake pans with liners-- you should make these no more than 3/4 full, because these cupcakes rise and dome very well-- you don't want them to overflow.  Less is more with filling these cupcakes. :)  Bake at 350 for 18-20 minutes, or until a toothpick inserted in the middle comes out clean.  Allow cupcakes to cool completely.

While these cupcakes cool, I make the ganache and the icing.

Dark Chocolate Ganache
(Adapted from Joyofbaking.com)

5 ounces dark chocolate, chopped (I used 4 oz Ghirardelli 60% Cocoa and 1 oz Ghirardelli Semi-Sweet)
1/2 cup heavy cream
1 Tbsp unsalted butter

Place chopped chocolate in a heat-proof bowl.  In a small saucepan, bring cream and butter to a simmer.  Pour cream-butter combination over chopped chocolate and let it sit for 5 minutes.  This is important!  Don't be impatient and try to stir too early (like I did the first few times I made ganache).  Then, whisk until smooth.  Let the ganache cool-- it will thicken a bit as it cools.  You can also make more or less ganache using the proportions of this recipe, which is nice.


...And after


Before....


Espresso Buttercream Frosting
(Adapted from the browneyed baker)

1/2 cup (1 stick) of unsalted butter, room temperature
1/2 cup of solid vegetable shortening (so, Crisco)
3 to 4 cups powdered sugar (depending on how stiff you want your icing)       
1 1/2 tsps instant espresso powder (additional powder to taste)
1 1/2 tsps vanilla extract
1 to 2 Tbsp milk

In a large bowl or the bowl of a stand mixer, cream together the butter and shortening.  (If Crisco grosses you out, you can use all butter.)  Scrape sides of the bowl and add the powdered sugar one cup at a time, mixing well after each addition.  The icing at this point will be very dry and stiff.

In a small bowl, mix together the vanilla and instant espresso powder.  Add to the icing and beat until thoroughly incorporated.  Add milk one Tbsp at a time until desired consistency is reached.  Note: in this house, we like our coffee, so we like a very strong espresso flavor in the icing.  When I add the milk at this point, I usually dissolve another tsp of the espresso powder into it before adding it to the icing.  The amount of espresso powder to add is up to your personal taste-- just be sure to dissolve it in the milk!  Do not add it directly to the icing.


Assembly:  Core the cooled cupcakes (tutorial here).  Fill each cupcake with approximately 1 Tbsp of ganache-- don't overfill or the cupcake hats won't go back on!  Frost using a large star tip on a pastry bag, or a baggie with the corner cut off.  Eat and enjoy!


Wednesday, September 14, 2011

Key Lime Cupcakes


I live in the South.  Like, the deep South.  On Labor Day here, it is still extraordinarily hot-- you'd never know that in other places in the US, Labor Day marks the start of fall.  Here, it's where we start to think, "Well, maybe in another two months we will be at 75 degrees.  At night."  What these cupcakes do mark is the end of my mental summer.  I've been teaching for three weeks now, and it feels like I never left-- like the summer never even happened.  I also just turned thirty.  So in a lot of different ways, the party is officially over.  I made these cupcakes for the Labor Day family gathering that my parents hosted-- they were a special request. :)  This is the second time I've made these key lime cupcakes, and they were excellent this time around.  They are time-intensive, but definitely worth the work.  And keep in mind-- TRUE key lime pie filling is NOT some electric shade of green! 

Graham Cracker Cupcakes
(Adapted from Ming Makes Cupcakes)

NOTE:  This recipe makes about 12 cupcakes.  I plan to double this next time I make these.

Graham Crust Bottoms
3/4 cup graham cracker crumbs
1/8 cup sugar
3 Tbsp unsalted butter, melted

Mix all ingredients together until the sugar is absorbed and all the graham cracker crumbs are wet.  Press into the bottom of each cupcake liner.  It took about a tablespoon to crumb mixture to cover the bottoms.


Graham Cracker Cupcakes
1 cup flour
1/2 cup graham cracker crumbs
1 1/2 tsp baking powder
1/4 tsp salt
1 stick unsalted butter, room temperature, cut into 5-7 pieces
1 cup sugar
2 eggs
1/2 tsp vanilla
1/2 cup milk

Preheat oven to 400.  (Or, if your oven is as hot as mine, 375.)  In the large bowl, or the bowl of a stand mixer, stir together the flour, graham cracker crumbs, baking powder, and salt.  Mix in the butter a piece at a time.  Beat in sugar thoroughly-- at this point, the mixture will look pretty sandy.  Beat in eggs, one at a time.  Next, add vanilla and milk. mixing until just incorporated.  (I know this is a weird recipe, but it works.  I kept telling my husband that these were not going to come out right-- but they did.  And they are really good.)  Spoon the cake batter on top of the graham crusts already in the cupcake liners.  Bake for approximately 20 minutes.  Cool on a wire rack, then core for filling.  (If you are unsure how to core a cupcake, Annie's Eats has an excellent tutorial.  I used the cone method on these.  Also, Annie's Eats is my favorite baking blog.  I want to be Annie when I grow up.)

Key Lime Filling
(Recipe from Vanilla Garlic)

5 egg yolks, beaten
14 oz can of sweetened condensed milk
1/2 cup key lime juice (approximately 20 key limes)
1 tsp key lime zest

Zest a few of the key limes before you start juicing them.  Then, juice the key limes over a mesh strainer.  I use a citrus reamer to do mine-- this part is boring and irritating, but worth it.  I will tell you right now-- DO NOT USE FAKE LIME JUICE.  It will not taste same.  Put on your big girl pants and juice the key limes.


My key lime juicing set-up.
 Next, beat they egg yolks thoroughly, then add the key lime juice and the sweetened condensed milk.  Beat until smooth.  (I use the whisk attachment for the KitchenAid to do this.)  Chill for at least 10 minutes-- I chill this while I am making the whipped cream from the next step.

Whipped Cream (for the filling and topping)
(Recipe from Vanilla Garlic)

3 cups of heavy whipping cream
1/2 cup powdered sugar

Beat in the bowl of a stand mixer with the whisk attachment until the cream is billowy and holds peaks.

Final Assembly

Finish the filling-- stir 1-2 cups of the whipped cream into the chilled key lime filling, until it reaches your desired taste/consistency.  (I don't add a ton-- we like it tart over here.)  Spoon the prepared filling into your cored cupcakes and replace the "lid" of the cupcake.

Filled cupcakes.  Notice the filling is a nice creamy color-- NOT GREEN.
Put the remainder of the whipped cream into a pastry bag with a large star tip, or into a baggie with a corner cut off. Pipe the whipped cream onto the top of the cupcakes.  Finish by sprinkling a small bit of the key lime zest on top of the whipped cream.


The finished product!  A yummy and fitting end to summer.  Now-- on to fall.  I am SO EXCITED about fall baking.  I don't care if it is 90+ degrees outside!  Time for apples and pumpkins in my kitchen.  Happy Autumn, friends!  Welcome to the start of a new season.

Tuesday, August 30, 2011

Reese's Cup Stuffed Peanut Butter Cookies


These cookies are out of control.  (If you know me, you know that's the current catchphrase.  I don't know where it came from.)  These are peanut butter chocolate chip cookies with an ENTIRE full-size Reese's cup inside of them.  Like I said, out of control.

I made these for one of my friends who is training for a long-distance run.  Suddenly, all of my friends are runners, which is totally amazing.  They have all inspired me to get my own butt moving just to keep up with them.  I'm not anywhere near as fast or as capable of long distances as they are, but I'm getting there.  :)  I'll be running (and walking) my first 5K the day before I turn 30, and some of these amazing friends will be doing it with me, which I totally appreciate.  I don't know if they know how inspiring they are to me. 

And so what do I do to repay them?  I make them insane cookies.  Counter-productive?  Possibly.  Delicious?  Definitely.  But it's what I do.  By the way, those of you who are from Jacksonville know European Street Cafe and their crazy huge cookies?  These cookies are that size, and my friend and her husband tell me that these are just as good, which is very high praise indeed.

Reese's Cup Stuffed Peanut Butter Cookies
(Adapted from The Recipe Girl blog)
Makes 12 LARGE cookies

1/2 cup butter (1 stick)-- at room temperature
1/2 cup crunchy peanut butter (you really should use crunchy, not smooth)
1/2 cup white sugar
1/2 cup packed brown sugar
1 large egg
1 1/4 cups all-purpose flour
1/2 tsp baking powder
1/2 tsp baking soda
1/4 tsp salt
1 cup milk chocolate chip (approximately)
12 full-sized (!) Reese's cups

Preheat oven to 350 and line two cookie sheets with parchment paper.  If you don't have parchment paper, get some.  It's cheap and it has totally changed my life. :)

In a large bowl, or the bowl of a stand mixer, cream together butter, sugars, and peanut butter.  Next, add the egg and beat until fluffy.

In a separate bowl, whisk together the remaining dry ingredients (flour, baking powder, baking soda, and salt).  Add these dry ingredients to the wet ingredients in the large bowl, mixing until just incorporated.  Stir in the cup of chocolate chips.

You should have room for about 6 cookies per cookie sheet.  I did all the steps separately-- I did all the bottoms, all the middles, and all the tops at a time, instead of assembling each cookie separately.  So-- start each cookie with one heaping tablespoonful of dough.  (I used the Tbsp measuring spoon for this.)  Make 12 cookie bottoms on the cookie sheets.  Next, use a sugared fork to criss-cross each cookie bottom and smush it down flat for the Reese's cup.  Next, place one Reese's cup on top of each cookie bottom.


Cookie bottoms and Reese's cup middles
Next, add another heaping tablespoon of dough to top each cookie.  Just as before, use a sugared fork to criss-cross the top dough and flatten the dough over the Reese's cups.  After this step, I also pinched the dough together around the sides of the cookie, which turned out to be a good idea-- it kept the Reese's from running out of the cookies as they baked.


Final assembly
Bake until lightly browned-- approximately 12 minutes.  Try to wait until they cool to eat them. :)

Note 1:  A tip from the original recipe was to spray your measuring cup with Pam or another cooking spray before measuring the peanut butter so it would slide out more easily.  This DEFINITELY helps.

Note 2:  This is a very easy recipe to make dairy-free-- substitute soy or vegetable margarine for the butter (we use Willow Run) and use dairy-free chocolate chips (we use Ghirardelli's semi-sweet).  Obviously, you have to leave out the Reese's, but the dairy-free kiddo in this house doesn't even know she's missing them.


YUM.
 

Tuesday, August 23, 2011

Red Velvet Cupcakes with Cream Cheese Icing (Three Types!)


Red velvet cupcakes.  They are so pretty and elegant and southern.  Isn't it pretty?  Doesn't it look lovely?

Making red velvet cupcakes is gross.  It totally makes me feel like Hannibal Lecter-- like I am doing Very Bad Things in my kitchen.  I've got a bowl of icky, congealed goop.  I've got drippy red stuff everywhere.  I've got stains that are not coming out of my countertop.  It's like a bad horror movie.

But the end result?  So pretty and tasty.  And so you forget about the yuck...until the next time you make them. 

I made these cupcakes for one of my good friend's wedding shower,co-hosted by another one of my good friends.  This was one of the coolest showers I have been to-- there were no creepy wedding games or anything.  Just wine.  Lots of delicious wine.  And a knowledgeable guy pouring us lots of extra wine.  It was great.  I was also introduced to ebelskivers, which is a pastry I may have to investigate further.  Anyway, I had a lot of fun making these cupcakes and making them look pretty for such a special occasion.

Red Velvet Cupcakes
(Recipe from Annie's Eats)
Makes approx 24 cupcakes

2 1/2 cups cake flour
1 1/2 cups sugar
1 tsp baking soda
1 Tbsp cocoa powder
1 tsp salt
2 large eggs
1 1/2 cups vegetable oil
1 cup buttermilk
2 Tbsp (1 oz) red food coloring
1 tsp vanilla extract
1 tsp distilled white vinegar

Preheat oven to 350° and prepare cupcake pan with liners.  In a medium bowl, combine dry ingredients (cake flour, sugar, baking soda, cocoa powder, and salt)-- whisk to blend.  In another bowl or the bowl of your stand mixer, combine the eggs, vegetable oil, buttermilk, food coloring, vanilla, and vinegar.  Beat on medium until well combined-- everything should be a pretty uniform red color.  (The combination of these ingredients looks hideous-- I thought I had totally screwed up the first time I made these!)


This is the congealed-looking goop I was talking about.
Mix in the dry ingredients on low speed, beating until smooth (approximately two minutes).  Again, everything should be a uniform red color.


Divide the batter evenly between the cupcake pans-- there should be enough for 24 cupcakes.  Try not to overfill-- that way you have room for the icing!  Bake for  approximately 18 minutes, rotating pans halfway through.  Doing that helps to ensure that all the cupcakes stay the correct pretty red color and don't over-brown.


<----Before, with the scary serial killer mess....


                             And after! So civilized---->


Now-- it's time for the frosting.  I made three separate kinds for these cupcakes.  In order to do that, I doubled a butter-cream cheese base, and then divided it into three parts and made each part with a modified recipe.  I will give my modified versions here as well as post a link to the original recipes, in case you want to do a whole batch with just one type.

Butter-Cream Cheese Frosting Base
16 oz cream cheese (soft, but not warm)
10 Tbsp unsalted butter (room temperature-- not melting)

In a large bowl, beat the cream cheese and butter together until smooth.  Divide evenly between three bowls.

#1) Original Cream Cheese Frosting
(Recipe from Annie's Eats)

1/3 of the butter-cream cheese base
1 tsp vanilla extract (I used clear here to preserve the pretty white color)
1 1/2 cups confectioners' sugar

In a medium bowl, or the bowl of a stand mixer, beat the vanilla extract into the butter-cream cheese base.  Next, beat in the confectioners' sugar until smooth.  Ice 8 of the 24 cupcakes with this batch.

#2) Chocolate Cream Cheese Frosting
(Recipe from The Cupcake Project)

1/3 of the butter-cream cheese base
1/8(ish) cup cocoa powder (start here, but this is really to taste)
1 1/2 cup confectioners' sugar

In a medium bowl, or the bowl of a stand mixer, beat the confectioners' sugar into the butter-cream cheese base until smooth.  Next, beat in the cocoa powder until even and uniform in color.  Ice 8 of the 24 cupcakes with this batch.

#3) Cinnamon Cream Cheese Frosting
(Recipe from Tasty Kitchen)

1/3 of the butter-cream cheese base
1/2 tsp of vanilla extract
1/2 tsp of almond extract
3/4 tsp of cinnamon
1 1/2 cup confectioners' sugar

In a medium bowl, or the bowl of a stand mixer, beat the vanilla and almond extracts into the butter-cream cheese base.  Add the cinnamon and beat until evenly distributed.  Next, beat in the confectioners' sugar until smooth.  Ice 8 of the 24 cupcakes with this batch.


The final product!


Monday, August 15, 2011

Crescent Roll Spirals

So this weekend was the last weekend before school started, and I go to go to a bridal shower for one of my friends.  You know I can't go to an event without bringing something-- having been raised in the South, it's just what you do.  You attend an event, you bring food.  Done.  So, in the grand Southern tradition of using pre-packaged foods to create some other type of food, I made crescent roll spirals.  My mom gave me this recipe originally-- it's one of the few recipes I know by heart, so I had some trouble when I went to find the original recipe.  Some trouble as in, there is no original recipe that I can find.  I'm preeeeeettttttyyy sure it's a Pampered Chef recipe, but it's not in any of the books I have. So, if you see this and know where it came from, please leave me a comment and I will be sure to add the citation.  (Fact: I love citations.  As an English teacher, it's killing me that I have no source for this.)

I also made ridiculous cupcakes with three different types of frosting for this event-- that's what I'll put up next. :)  These spirals are good, but the cupcakes were out of control.  I'm excited to show you my picture of those.  Hopefully I will get them up later this week!

Crescent Spirals
(Recipe from my mother via Pampered Chef?)
Makes approximately 56 spirals

2 tubes of crescent rolls
1 tub of spreadable cheese (I use Alouette Garlic and Herb)
1 bag of baby spinach, pre-washed (you will have tons of this left over-- we usually make salad)
1 package of deli ham (at least 8 slices)

Pre-heat the oven to the temperature directed on the crescent roll package.  Open the tube of crescent rolls.  There will be two "rolls" of dough in the tube.  Unroll each roll and separate it into two squares.  Each square is made up of two triangles-- don't separate the triangles, even though they are perforated!  Pinch together the perforations between the triangles.  What you end up with will look like the picture below:

The crescent roll dough with the triangular perforations pinched/smoothed to make one dough square.
Next, spread a generous layer of the cheese on top of your dough square.


After the cheese, layer the spinach.  Try to get close as close to the edge as possible without going over.

Next, place one slice of ham on top.  This layer will most likely hang over the edge-- that's OK.

Once you have all the layers complete, hold the crescent roll at one of the short ends and roll it into a spiral.  Try to get this as tight as possible without ripping the dough.  (The ham layer makes this a little difficult.)  Your spirals will look like this:

Cut the spirals cross-ways into equal slices.  Mine usually make about 7 slices each.

Lay the spirals on a cookie sheet and bake for the time directed on your crescent roll package.


Repeat these steps until you've used all your crescent rolls!

Thursday, August 11, 2011

Caprese Salad

So I can't take any credit for this- it is my husband's creation. He's been making it all summer and it is sooo good. It's also very pretty. :)

Ingredients:
(for one salad)

1 tomato (we've been using vine-ripened)
1-2 oz fresh mozzarella
Fresh basil (to taste)
1 tbsp extra virgin olive oil
1 tbsp balsamic vinegar
Salt and pepper (to taste)

Cut tomato into approximately half-inch slices. Layer tomato, slice of mozzarella, and basil. Season each slice of tomato to taste. Once you've stacked the ingredients, drizzle the oil and balsamic vinegar into the bottom of the bowl.

Note: we've found that the Publix mozzarella from the deli is the best for this salad. 

Enjoy!


Sunday, August 7, 2011

Apple-Spice Cupcakes with Honey Cinnamon Cream Cheese Frosting

So, in an effort to prove to the interwebs that yes, actually, I can bake, I went to my default-- cupcakes.  Apparently the imminent start of school has me thinking about fall and fall flavors, because I went with apple spice cake and honey-cinnamon cream cheese frosting.  The cupcakes were easy-peasy; the frosting was harder to work with than I expected-- but it is sooo good. :)

As a quick note-- the cake here is dairy-free.  I have a three-year-old girl with a milk allergy, so a lot of what I do is chosen because it's easy to convert to a non-dairy recipe.  I will try to note both the dairy/non-dairy ingredients in the recipe so that you can choose the ingredients you want to use. So, here's the rundown:

Cake Ingredients:
(Adapted from Smitten Kitchen)
Makes approximately 24 cupcakes

2 cups all-purpose flour
2 teaspoons baking powder
1/2 teaspoon baking soda
1/4 teaspoon salt
3/4 teaspoon cinnamon
1/2 teaspoon ground ginger
1/8 teaspoon ground cloves
1 stick non-dairy margarine OR unsalted butter, softened
1 cup packed light brown sugar
1 teaspoon pure vanilla extract
2 large eggs
1 1/2 cups applesauce (sweetened or unsweetened-- I used sweetened)

Preheat oven to 350 and prepare two cupcake pans with liners (approx. 24).  In a medium mixing bowl, combine flour, baking powder, baking soda, salt, and spices (cinnamon, ginger, and cloves).

With an electric mixer, beat together butter/margarine, brown sugar, and vanilla until fluffy (2-3 minutes).  Add eggs one at a time to butter/sugar mixture, beating well after each addition.  Beat in applesauce.  (Note: at this point, my batter looked AWFUL-- like it had curdled.  I think part of this was due to the fact that I used the margarine rather than butter, but even in the original recipe there is a note regarding its icky appearance.  Don't freak out-- just keep going.)  Add the flour mixture, beating at low speed until just combined.

Fill the prepared cupcake liners approximately 2/3 full with the batter.  Don't overfill them, because you are going to want some room for the frosting after they've baked.  I did about 2-ish heaping tablespoons, and that seemed to work for most of mine.  It really should make about 24 cupcakes-- you shouldn't have a ton of batter left over, nor should you run short.

Bake at 350 for about 18-20 minutes.  Keep an eye on them-- my oven runs hot (like, surface-of-the-sun hot), so my time measurements may be off.  Remove from oven, cool in the tins for about 5 minutes, then transfer to wire racks to finish cooling.

Frosting:
(Inspired by recipe in magazine100 Best Cookies, published December 2010 by Better Homes and Gardens)

1 package (8 ounces) of cream cheese, softened (I used fat-free-- it didn't seem to make a difference)
1 stick unsalted butter, softened
1/4 cup honey
4 cups powdered sugar
1/2 teaspoon cinnamon

Blend the cream cheese, butter, and honey in a mixing bowl.  (If you have a stand mixer, I would definitely use it for this.)  Add the powdered sugar one cup at a time, mixing well.  Scrape the sides of the bowl after each addition.  (This frosting doesn't set up like a regular buttercream-- it will definitely be pretty soupy, even after the final addition of the powdered sugar.)  Add cinnamon; mix well.  Refrigerate the frosting for at least 30 minutes-- this will make it easier to handle.  (Just FYI-- this frosting is insanely sticky.  It's the kind of sticky that makes me crazy-- I ended up washing my hands about 50 times while making/frosting/decorating these bad boys.)

To decorate, I put the frosting in a ziploc with the corner cut off and spiraled the frosting on from the outside to the inside, like you'd normally do.  The spiral design won't set-- the frosting flattens itself out, so I decided to add some decoration.  My handy husband cut out a heart stencil from the sytrofoam egg carton for me, and I used that to make cinnamon-sugar hearts on the tops of the cupcakes once they'd been iced.
Make sure you don't put the stencil directly on the top of the cupcake-- it will definitely stick and make a mess.  Just hold it close to the top and gently shake on the cinnamon sugar.  I moved evenly from the top of the stencil to the bottom, and that seemed to work pretty well.  The finished product looks like this:
Most of these are going to preschool with the little girl tomorrow for the teachers.  They and my colleagues have ended up as my test kitchen!  No one seems to mind too much.

So-- hopefully I have convinced you that I am capable of following directions. And hopefully I have faithfully reproduced these directions here!  Enjoy-- I certainly did. :)